
Geotagging
NOTE: This chapter actually describes the TTT2 pipeline software, which differs slightly from the Geoparser. However, all the important points on the operation of the geotagging step are covered.
Introduction
This documentation is intended to provide a detailed description of the pipelines provided in the LT-TTT2 distribution. The pipelines are implemented as Unix shell scripts and contain calls to processing steps which are applied to a document in sequence in order to add layers of XML mark-up to that document.
This document does not contain any explanation of lxtransduce
grammars or XPath expressions. For an introduction to the
lxtransduce grammar rule formalism, see the tutorial
documentation. See
also the lxtransduce manual
as well as the documentation for the LT-XML2 programs.
LT-TTT2 includes some software not originating in Edinburgh which has
been included with kind permission of the authors. Specifically, the
part-of-speech (POS) tagger is the C&C tagger and the lemmatiser is
morpha. See Sections The postag Component and The lemmatise Component
below for more information and conditions of use.
LT-TTT2 also includes some resource files which have been derived from a variety sources including UMLS, Wikipedia, Project Gutenberg, Berkeley and the Alexandria Digital Library Gazetteer. See Sections The tokenise Component, The lemmatise Component and The nertag Component below for more information and conditions of use.
Pipelines
The run script
The LT-TTT2 pipelines are found in the TTT2/scripts directory and
are NLP components or sub-components, apart from TTT2/scripts/run
which is a pipeline that applies all of the NLP components in sequence
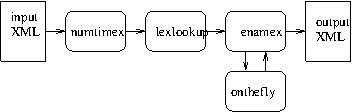
to a plain text document. The diagram in Figure The run pipeline shows
the sequence of commands in the pipeline.

The run pipeline
The script is used from the command line in the following kinds of ways (from the directory):
./scripts/run < data/example1.txt > your-output-file
cat data/example1.txt | ./scripts/run | more
The steps in Figure The run pipeline appear in the script as follows:
1. cat >$tmp-input

2. $here/scripts/preparetxt <$tmp-input >$tmp-prepared

3. $here/scripts/tokenise <$tmp-prepared >$tmp-tokenised

4. $here/scripts/postag -m $here/models/pos <$tmp-tokenised >$tmp-postagged

5. $here/scripts/lemmatise <$tmp-postagged >$tmp-lemmatised

6. $here/scripts/nertag <$tmp-lemmatised >$tmp-nertagged

7. $here/scripts/chunk -s nested -f inline <$tmp-nertagged >$tmp-chunked

8. cat $tmp-chunked
Step 1 copies the input to a temporary file $tmp-input, (see
Section Setup for information about $tmp). This is then
used in Step 2 as the input to the first processor which converts a
plain text file to XML and writes its output as the temporary file
$tmp-prepared. Each successive step takes as input the temporary
file which is output from the previous step and writes its output to
another appropriately named temporary file. The output of the final
processor is written to $tmp-chunked and the final step of the
pipeline uses the Unix command cat to send this file to standard
output.
Setup
All of the pipeline scripts contain this early step:
. `dirname $0`/setup
This causes the commands in the file TTT2/scripts/setup to be run
at this point and establishes a consistent naming convention for paths
to various resources. For the purposes of understanding the content of
the pipeline scripts, the main points to note are:
- The variable takes as value the full path to the
TTT2directory. - A
$binvariable is defined asTTT2/binand is then added to the value of the user’sPATHvariable so that the scripts can call the executables such aslxtransducewithout needing to specify a path. - The variable
$tmpis defined for use by the scripts to write temporary files and ensure that they are uniquely named. The value of$tmpfollows this pattern:/tmp/<USERNAME>-<NAME-OF-SCRIPT>-<PROCESS-ID>. Thus the temporary file created by Step 2 above ($tmp-prepared, the temporary file containing the output ofTTT2/scripts/preparetxt) might be/tmp/bloggs-run-959-prepared.
Temporary files are removed automatically after the script has run, so
cannot usually be inspected. Sometimes it is useful to retain them for
debugging purposes and the setup script provides a method to do this — if
the environment variable LXDEBUG is set then the temporary files are not
removed. For example, this command:
LXDEBUG=1 ./scripts/run <data/example1.txt >testout.xml
causes the script run to be run and retains the temporary files that are
created along the way.
Component Scripts
The main components of the run pipeline as shown in Figure
The run pipeline are also located in the TTT2/scripts directory. They are
described in detail in Sections The preparetext Component – The chunk Component.
The needs of users will vary and not all users will want to use all the components. The script has been designed so that it is simple to edit and configure for different needs. There are dependencies, however:
preparetxtassumes a plain text file as input;- all other components assume an XML document as input;
tokeniserequires its input to contain paragraphs marked up as<p>elements;- the output of
tokenisecontains<s>(sentence) and<w>(word) elements and all subsequent components require this format as input; lemmatise,nertagandchunkrequire part-of-speech (POS) tag information sopostagmust be applied before them;- if both
nertagandchunkare used thennertagshould be applied beforechunk.
Each of the scripts has the effect of adding more XML mark-up to the
document. In all cases, except chunk, the new mark-up appears on
or around the character string that it relates to. Thus words are
marked up by wrapping word strings with a <w> element, POS tags
and lemmas are realised as attributes on <w> elements, and named
entities are marked up by wrapping <w> sequences with appropriate
elements. The chunk script allows the user to choose among a
variety of output formats, including BIO column format and standoff
output (see Section The chunk Component for details). Section Visualising output
discusses how the XML output of pipelines can be converted to formats
which make it easier to visualise.
The components are Unix shell scripts where input is read from
standard input and output is to standard output. Most of the scripts
have no arguments apart from postag and chunk: details of
their command line options can be found in the relevant sections
below.
The component scripts are similar in design and in the beginning parts they follow a common pattern:
usageanddescrvariables are defined for use in error reporting;- the next part is a command to run the
setupscript (.~`dirname $0`/setup) as described in Section Setup above - a
whileloop handles arguments appropriately - a
libvariable is set to point to the directory in which the resource files for the component are kept. For example, inlemmatiseit is defined like this:lib=\$here/lib/lemmatiseso that instances of$libin the script expand out toTTT2/lib/lemmatise. ($hereis defined in the script as theTTT2directory.)
The preparetext Component
Overview
The preparetxt component is a Unix shell script called with no
arguments. Input is read from standard input and output is to standard
output.
This script converts a plain text file into a basic XML format and is a
necessary step since the LT-XML2 programs used in all the following
components require XML as input. The script generates an XML header and
wraps the text with a text element. It also identifies paragraphs and
wraps them as <p> elements. If the input file is this:
This is a piece of text.

It needs to be converted to XML.
the output is this:
<?xml version="1.0" encoding="ISO-646"?>
<!DOCTYPE text [
<!ELEMENT text (#PCDATA)*>
]>
<text>
<p>This is a piece of text.</p>

<p>It needs to be converted to XML.</p>
</text>
Some users may want to process data which is already in XML, in which
case this step should not be used. Instead, it should be ensured that
the XML input files contain paragraphs wrapped as <p> elements. So long as
there is some kind of paragraph mark-up, this can be done using lxreplace.
For example, a file containing para elements like this:
<body><para>This is a piece of text.</para>

<para>It needs to be converted to XML.</para></body>
can easily be converted using this command:
cat input-file | lxreplace -q para -n "'p'"
so that the output is this:
<body><p>This is a piece of text.</p>

<p>It needs to be converted to XML.</p></body>
Note that parts of the XML structure above the paragraph level do not need to be changed since the components only affect either paragraphs or sentences and words inside paragraphs.
The preparetext script
In the early part of the script the $lib variable is defined to
point to TTT2/lib/preparetxt/ which is the location of the
resource files used by the preparetxt pipeline. The remainder of
the script contains the sequence of processing steps piped together
that constitute the preparetxt pipeline.
The preparetext pipeline
1. lxplain2xml -e guess -w text |

2. lxtransduce -q text $lib/paras.gr
Step 1: lxplain2xml -e guess -w text
This step uses the LT-XML2 program lxplain2xml to convert the text
into an XML file. The output is the text wrapped in a text root
element (-w text) with an XML header that contains an encoding
attribute which lxplain2xml guesses (-e guess) based on the
characters it encounters in the text. The output of this step given
the previous input file is this:
<?xml version="1.0" encoding="ISO-646"?>
<!DOCTYPE text [
<!ELEMENT text (#PCDATA)*>
]>
<text>
This is a piece of text.

It needs to be converted to XML.
<\text>
The file TTT2/data/utf8-example contains a UTF-8 pound
character. If Step 1 is used with this file as input, the output has a
UTF-8 encoding:
<?xml version="1.0" encoding="utf-8"?>
<!DOCTYPE text [
<!ELEMENT text (#PCDATA)*>
]>
<text>
This example contains a UTF-8 character, i.e. £.
</text>
Step 2: lxtransduce -q text $lib/paras.gr
The second and final step in the preparetxt pipeline uses the
LT-XML2 program lxtransduce with the grammar rule file
TTT2/preparetxt/paras.gr to identify and mark up paragraphs in the
text as <p> elements. On the first example in this section the
output contains two paragraphs as already shown above. On a file with
no paragraph breaks, the entire text is wrapped as a <p> element, for
example:
<?xml version="1.0" encoding="ISO-646"?>
<!DOCTYPE text [
<!ELEMENT text (#PCDATA)*>
]>
<text>
<p>This is a piece of text. It needs to be converted to XML.</p>
<\text>
Note that if the encoding is UTF-8 then the second step of the
pipeline does not output the XML declaration since UTF-8 is the
default encoding. Thus the output of preparetxt on the file
TTT2/data/utf8-example is this:
<!DOCTYPE text [
<!ELEMENT text (#PCDATA)*>
]>
<text>
<p>This example contains a UTF-8 character, i.e. £.</p>
</text>
The tokenise Component
Overview
The tokenise component is a Unix shell script called with no
arguments. Input is read from standard input and output is to standard
output.
This is the first linguistic processing component in all the top level
scripts and is a necessary prerequisite for all other linguistic
processing. Its input is an XML document which must contain paragraphs
marked up as <p> elements. The tokenise component acts on the
<p> elements by (a) segmenting the character data content into
<w> (word) elements and (b) identifying sentences and wrapping
them as <s> elements. Thus an input like this:
<document>
<text>
<p>
This is an example. There are two sentences.
</p>
</text>
</document>
is transformed by and output like this (modulo white space which has been changed for display purposes):
<document>
<text>
<p>
<s id="s1">
<w id="w3" c="w" pws="yes">This</w> <w id="w8" c="w" pws="yes">is</w>
<w id="w11" c="w" pws="yes">an</w> <w id="w14" c="w" pws="yes">example</w>
<w id="w21" pws="no" sb="true" c=".">.</w>
</s>
<s id="s2">
<w id="w23" c="w" pws="yes">There</w> <w id="w29" c="w" pws="yes">are</w>
<w id="w33" c="w" pws="yes">two</w> <w id="w37" c="w" pws="yes">sentences</w>
<w id="w46" pws="no" sb="true" c=".">.</w>
</s>
</p>
</text>
</document>
The attribute on <w> elements encodes a unique id for each word
based on the start position of its first character. The attribute on
<s> elements encodes unique sequentially numbered ids for
sentences. The c attribute is used to encode word type (see
Table 2 for complete list of values). It serves
internal purposes only and can possibly be removed at the end of
preprocessing. All <w> elements have a pws attribute which has
a no value if there is no white space between the word and the
preceding word and a yes value otherwise. The sb attribute on
sentence final full stops serves to differentiate these from sentence
internal full stops. The pws and sb attributes are used by the
nertag component.
The tokenise script
In the early part of the script the $lib variable is defined to
point to TTT2/lib/tokenise/ which is the location of the resource
files used by the tokenise pipeline. The remainder of the script
contains the sequence of processing steps piped together that
constitute the tokenise pipeline.
The tokenise pipeline
 1. lxtransduce -q p $lib/pretokenise.gr |

 2. lxtransduce -q p $lib/tokenise.gr |

 3. lxreplace -q "w/cg" |

 4. lxtransduce -q p -l lex=$lib/mobyfuncwords.lex $lib/sents-news.gr |

 5. lxtransduce -q s -l lex=$here/lib/nertag/numbers.lex $lib/posttokenise.gr |

 6. lxreplace -q "w/w" |

 7. lxreplace -q "w[preceding-sibling::*[1][self::w]]" -t "<w pws='no'>&attrs;&children;</w>" |

 8. lxreplace -q "w[not(@pws)]" -t "<w pws='yes'>&attrs;&children;</w>" |

 9. lxreplace -q cg |

10. lxaddids -e 'w' -p "'w'" -c '//text()' |

11. lxaddids -e 's' -p "'s'"
Step 1: lxtransduce -q p $lib/pretokenise.gr
The first step in the pipeline uses lxtransduce with the rules in
pretokenise.gr. The query (-q p) establishes <p> elements
as the part of the XML that the rules are to be applied to. The
pretokenise grammar converts character data inside <p> elements
into a sequence of ‘character groups’ (<cg> elements) so that
this:
<p>"He's gone", said
Fred.</p>
is output as follows:
<p><cg c='qut' qut='d'>"</cg><cg c='uca'>H</cg><cg c='lca'>e</cg>
<cg c='qut' qut='s'>'</cg><cg c='lca'>s</cg><cg c='ws'> </cg>
<cg c='lca'>gone</cg><cg c='qut' qut='d'>"</cg><cg c='cm'>,</cg>
<cg c='ws'> </cg><cg c='lca'>said</cg><cg c='nl'>
</cg><cg c='uca'>F</cg><cg c='lca'>red</cg><cg c='stop'>.</cg></p>
Note that here and elsewhere we introduce line breaks to display
examples to make them readable but that they are not to be thought of
as part of the example. Every actual character in this example is
contained in a <cg>, including whitespace and newline characters,
e.g. the newline between said and Fred in the current example. The
c attribute on <cg> elements encodes the character type,
e.g. lca indicates lower case. Table 1 contains a
complete list of values for the c attribute on <cg>
elements. Note that quote <cg> elements (c='qut') have a
further attribute to indicate whether the quote is single or double:
qut='s' or qut='d'.
| Code | Meaning |
|---|---|
| amp | ampersand |
| brk | bracket (round, square, brace) |
| cd | digits |
| cm | comma, colon, semi-colon |
| dash | single dash, sequence of dashes |
| dots | sequence of dots |
| gt | greater than (character or entity) |
| lca | lowercase alphabetic |
| lc-nt | lowercase n’t |
| lt | less than entity |
| nl | newline |
| pct | percent character |
| qut | quote |
| slash | forward and backward slashes |
| stop | full stop, question mark, exclamation mark |
| sym | symbols such as +, -, @ etc. |
| tab | tab character |
| uca | uppercase alphabetic |
| uc-nt | uppercase n’t |
| what | unknown characters |
| ws | whitespace |
Table 1: Values for the c attribute on <cg> elements
Step 2: lxtransduce -q p $lib/tokenise.gr
The second step in the pipeline uses lxtransduce with
tokenise.gr. The query again targets <p> elements but in this
step the grammar uses the <cg> elements of the previous step and
builds <w> elements from them. Thus the output of step 1 is
converted to this:
<p><w c="lquote" qut="d"><cg qut="d" c="qut">"</cg></w>
<w c="w"><cg c="uca">H</cg><cg c="lca">e</cg></w>
<w c="aposs"><cg qut="s" c="qut">'</cg><cg c="lca">s</cg></w><cg c="ws"> </cg>
<w c="w"><cg c="lca">gone</cg></w>
<w c="rquote" qut="d"><cg qut="d" c="qut">"</cg></w><w c="cm"><cg c="cm">,</cg></w>
<cg c="ws"> </cg><w c="w"><cg c="lca">said</cg></w><cg c="nl">
</cg><w c="w"><cg c="uca">F</cg><cg c="lca">red</cg></w>
<w c="."><cg c="stop">.</cg></w></p>
Note that the apostrophe+s sequence in He’s has been recognised as
such (aposs value for the attribute). Non-apostrophe quote <w>
elements acquire an lquote, rquote or quote value for
c (left, right or can’t be determined) and have a further
attribute to indicate whether the quote is single or double:
qut='s' or qut='d'. Table 2 contains a
complete list of values for the c attribute on <w> elements.
| Code | Meaning |
|---|---|
| . | full stop, question mark, exclamation mark |
| abbr | abbreviation |
| amp | ampersand |
| aposs | apostrophe s |
| br | bracket (round, square, brace) |
| cc | and/or |
| cd | numbers |
| cm | comma, colon, semi-colon |
| dash | single dash, sequence of dashes |
| dots | sequence of dots |
| hyph | hyphen |
| hyw | hyphenated word |
| lquote | left quote |
| ord | ordinal |
| pcent | percent expression |
| pct | percent character |
| quote | quote (left/right undetermined) |
| rquote | right quote |
| slash | forward and backward slashes |
| sym | symbols such as +, -, @ etc. |
| w | ordinary word |
| what | unknown type of word |
Table 2: Values for the c attribute on <w> elements
Step 3: lxreplace -q "w/cg"
The third step uses lxreplace to remove <cg> elements inside
the new <w> elements. (Word internal <cg> elements are no
longer needed, but those occurring between words marking whitespace
and newline are retained for use by the sentence grammar.) The output
now looks like this:
<p><w qut="d" c="lquote">"</w><w c="w">He</w><w c="aposs">'s</w><cg c="ws"> </cg>
<w c="w">gone</w><w qut="d" c="rquote">"</w><w c="cm">,</w><cg c="ws"> </cg>
<w c="w">said</w><cg c="nl">
</cg><w c="w">Fred</w><w c=".">.</w></p>
Step 4: lxtransduce -q p -l lex=$lib/mobyfuncwords.lex $lib/sents-news.gr
The next step uses lxtransduce to mark up sentences as <s>
elements. As well as using the sents-news.gr rule file, a lexicon
of function words (mobyfuncwords.lex, derived from Project
Gutenberg’s Moby Part of Speech List [1]) is consulted. This is used
as a check on a word with an initial capital following a full stop: if
it is a function word then the full stop is a sentence boundary. The
output on the previous example is as follows:
<p><s><w c="lquote" qut="d">"</w><w c="w">He</w><w c="aposs">'s</w><cg c="ws"> </cg>
<w c="w">gone</w><w c="rquote" qut="d">"</w><w c="cm">,</w><cg c="ws"> </cg>
<w c="w">said</w><cg c="nl">
</cg><w c="w">Fred</w><w c="." sb="true">.</w></s></p>
The tokenise script is set up to use a sentence grammar which is
quite general but which is tuned in favour of newspaper text and the
abbreviations that occur in general/newspaper English. The
distribution contains a second sentence grammar, sents-bio.gr,
which is essentially the same grammar but which has been tuned for
biomedical text. For example, the abbreviation Mr. or MR. is
expected not to be sentence final in sents-news.gr but is
permitted to occur finally in sents-bio.gr. Thus this example:
<p>
I like Mr. Bean.
XYZ interacts with 123 MR. Experiments confirm this.
</p>
is segmented by sents-news.gr as:
<p>
<s>I like Mr. Bean.</s>
<s>XYZ interacts with 123 MR. Experiments confirm this.</s>
</p>
while sents-bio.gr segments it like this:
<p>
<s>I like Mr.</s>
<s>Bean.</s>
<s>XYZ interacts with 123 MR.</s>
<s>Experiments confirm this.</s>
</p>
The sents-bio.gr qgrammar has been tested on the Genia corpus and performs very well.
Step 5: lxtransduce -q s -l lex=$here/lib/nertag/numbers.lex $lib/posttokenise.gr
The fifth step applies lxtransduce with the rule file
posttokenise.gr to handle hyphenated words and to handle full
stops belonging to abbreviations. Since an <s> layer of annotation
has been introduced by the previous step, the query now targets
<s> elements rather than <p> elements. In the input to
posttokenise.gr, hyphens are split off from their surrounding
words, so this grammar combines them to treat most hyphenated words as
words rather than as word sequences — it wraps a <w> element (with
the attribute c='hyw') around the relevant sequence of <w>
elements, thus creating <w> inside <w> mark-up. The grammar
consults a lexicon of numbers in order to exclude hyphenated numbers
from this treatment. (Later processing by the numex and timex named
entity rules requires that these should be left separated.) Thus if
the following is input to tokenise:
<p>
Mr. Bean eats twenty-three ice-creams.
</p>
the output after the post-tokenisation step is:
<p>
<s><w c="abbr"><w c="w">Mr</w><w c=".">.</w></w><cg c="ws"> </cg><w c="w">Bean</w>
<cg c="ws"> </cg><w c="w">eats</w><cg c="ws"> </cg><w c="w">twenty</w>
<w c="hyph">-</w><w c="w">three</w><cg c="ws"> </cg>
<w c="hyw"><w c="w">ice</w><w c="hyph">-</w><w c="w">creams</w></w>
<w sb="true" c=".">.</w></s>
</p>
The grammar also handles full stops which are part of abbreviations by
wrapping a <w> element (with the attribute c='abbr') around a
sequence of a word followed by a non-sentence final full stop (thus
again creating w/w elements). The Mr. in the current example
demonstrates this aspect of the grammar.
Note that this post-tokenisation step represents tokenisation decisions that may not suit all users for all purposes. Some applications may require hyphenated words not to be joined (e.g. the biomedical domain where entity names are often subparts of hyphenated words (NF-E2-related)) and some downstream components may need trailing full stops not to be incorporated into abbreviations. This step can therefore be omitted altogether or modified according to need.
Step 6: lxreplace -q "w/w"
The sixth step in the tokenise pipeline uses lxreplace to
remove the embedded mark-up in the multi-word words created in the
previous step.
Step 7 & 8:
lxreplace -q "w[preceding-sibling::*[1][self::w]]" -t "<w pws='no'>&attrs;&children;</w>" |
lxreplace -q "w[not(@pws)]" -t "<w pws='yes'>&attrs;&children;</w>"
The seventh and eighth steps add the attribute pws to <w>
elements. This attribute indicates whether the word is preceded by
whitespace or not and is used by other, later LT-TTT2 components
(e.g., the nertag component). Step 7 uses lxreplace to add
pws='no' to <w> elements whose immediately preceding sibling
is a <w>. Step 8 then adds pws='yes' to all remaining <w>
elements.
Step 9: lxreplace -q cg
At this point the <cg> mark-up is no longer needed and is removed by step 9.
The output from steps 6–9 is as follows:
<p><s><w c="abbr" pws="yes">Mr.</w> <w c="w" pws="yes">Bean</w>
<w c="w" pws="yes">eats</w>
<w c="w" pws="yes">twenty</w><w c="hyph" pws="no">-</w><w c="w" pws="no">three</w>
<w c="hyw" pws="yes">ice-creams</w><w c="." sb="true" pws="no">.</w></s></p>
Steps 10 & 11:
lxaddids -e 'w' -p "'w'" -c '//text()' |
lxaddids -e 's' -p "'s'"
In the final two steps lxaddids is used to add id attributes to
words and sentences. The initial example in this section, reproduced
here, shows the input and output from tokenise where the words and
sentences have acquired ids through these final steps:
<document>
<text>
<p>
This is an example. There are two sentences.
</p>
</text>
</document>
<document>
<text>
<p>
<s id="s1">
<w id="w3" c="w" pws="yes">This</w> <w id="w8" c="w" pws="yes">is</w>
<w id="w11" c="w" pws="yes">an</w> <w id="w14" c="w" pws="yes">example</w>
<w id="w21" pws="no" sb="true" c=".">.</w>
</s>
<s id="s2">
<w id="w23" c="w" pws="yes">There</w> <w id="w29" c="w" pws="yes">are</w>
<w id="w33" c="w" pws="yes">two</w> <w id="w37" c="w" pws="yes">sentences</w>
<w id="w46" pws="no" sb="true" c=".">.</w>
</s>
</p>
</text>
</document>
In step 10, the -p "'w'" part of the lxaddids command prefixes
the id value with w. The -c '//text()' option ensures that
the numerical part of the id reflects the position of the start
character of the <w> element (e.g. the initial e in example is
the 14th character in the text element). We use this kind of id so
that retokenisations in one part of a file will not cause id changes
in other parts of the file. Step 11 is similar except that for id
values on s elements the prefix is s. We have also chosen not
to have the numerical part of the id reflect character position —
instead, through not supplying a -c option, the default behaviour
of sequential numbering obtains.
The postag Component
Overview
The postag component is a Unix shell script called with one
argument via the -m option. The argument to -m is the name of
a model directory. The only POS tagging model provided in this
distribution is the one found in TTT2/models/pos but we have
parameterised the model name in order to make it easier for users
wishing to use their own models. Input is read from standard input and
output is to standard output.
POS tagging is the next step after tokenisation in all the top level
scripts since other later components make use of POS tag information.
The input to postag is a document which has been processed by
tokenise and which contains <p>, <s>, and <w>
elements. The postag component adds a p attribute to each
<w> with a value which is the POS tag assigned to the word by the
C&C POS tagger using the TTT2/models/pos model. Thus an input like
this (output from tokenise):
<document>
<text>
<p>
<s id="s1">
<w id="w3" c="w" pws="yes">This</w> <w id="w8" c="w" pws="yes">is</w>
<w id="w11" c="w" pws="yes">an</w> <w id="w14" c="w" pws="yes">example</w>
<w id="w21" pws="no" sb="true" c=".">.</w>
</s>
<s id="s2">
<w id="w23" c="w" pws="yes">There</w> <w id="w29" c="w" pws="yes">are</w>
<w id="w33" c="w" pws="yes">two</w> <w id="w37" c="w" pws="yes">sentences</w>
<w id="w46" pws="no" sb="true" c=".">.</w>
</s>
</p>
</text>
</document>
is transformed by postag and output like this:
<document>
<text>
<p>
<s id="s1">
<w pws="yes" c="w" id="w3" p="DT">This</w> <w pws="yes" c="w" id="w8" p="VBZ">is</w>
<w pws="yes" c="w" id="w11" p="DT">an</w> <w pws="yes" c="w" id="w14" p="NN">example</w>
<w c="." sb="true" pws="no" id="w21" p=".">.</w>
</s>
<s id="s2">
<w pws="yes" c="w" id="w23" p="EX">There</w> <w pws="yes" c="w" id="w29" p="VBP">are</w>
<w pws="yes" c="w" id="w33" p="CD">two</w> <w pws="yes" c="w" id="w37" p="NNS">sentences</w>
<w c="." sb="true" pws="no" id="w46" p=".">.</w>
</s>
</p>
</text>
</document>
The POS tagger called by the postag script is the C&C maximum
entropy POS tagger (Curran and Clark 2003 [2]) trained on data tagged
with the Penn Treebank POS tagset (Marcus, Santorini, and
Marcinkiewicz 1993 [3]). We have included the relevant Linux binary
and model from the C&C release at
http://svn.ask.it.usyd.edu.au/trac/candc/wiki with the permission
of the authors. The binary of the C&C POS tagger, which in this
distribution is named TTT2/bin/pos, is a copy of
candc-1.00/bin/pos from the tar file candc-linux-1.00.tgz. The
model, which in this distribution is named TTT2/models/pos, is a
copy of ptb_pos from the tar file ptb_pos-1.00.tgz. This
model was trained on the Penn Treebank (see TTT2/models/pos/info
for more details). The C&C POS tagger may be used under the terms of
the academic (non-commercial) licence at
http://svn.ask.it.usyd.edu.au/trac/candc/wiki/Licence.
Note that the postag script is simply a wrapper for a particular
non-XML based tagger. It converts the input XML to the input format of
the tagger, invokes the tagger, and then merges the tagger output back
into the XML representation. It is possible to make changes to the
script and the conversion files in order to replace the C&C tagger
with another.
The postag script
Since postag is called with a -m argument, the early part of the script is more
complex than scripts with no arguments. The while and if loops set up the
-m argument so that the path to the model has to be provided when the
component is called. Thus all the top level scripts which call the
postag component do so in this way:
$here/scripts/postag -m $here/models/pos
In the next part of the script the $lib variable is defined to
point to TTT2/lib/postag/ which is the location of the resource
files used by the postag pipeline. The remainder of the script
contains the sequence of processing steps piped together that
constitute the postag pipeline.
The postag pipeline
1. cat >$tmp-in

2. lxconvert -w -q s -s $lib/pos.cnv <$tmp-in |

3. pos -model $model 2>$tmp-ccposerr |

4. lxconvert -r -q s -s $lib/pos.cnv -x $tmp-in
Step 1: cat >$tmp-in
The first step in the pipeline copies the input to the temporary file
$tmp-in. This is so that it can both be converted to C&C input
format as well as retained as the file that the C&C output will be
merged with.
Step 2: lxconvert -w -q s -s $lib/pos.cnv <$tmp-in
The second step uses lxconvert to convert into the right format
for input to the C&C POS tagger (one sentence per line, tokens
separated by white space). The -s option instructs it to use the
TTT2/lib/postag/pos.cnv stylesheet, while the -q s query makes
it focus on <s> elements. (The component will therefore not work
on files which do not contain <s> elements.) The -w option
makes it work in write mode so that it follows the rules for writing
C&C input format. If the following tokenise output:
<p><s id="s1"><w id="w0" c="abbr" pws="yes">Mr.</w> <w id="w4" c="w" pws="yes">Bean</w>
<w id="w9" c="w" pws="yes">had</w> <w id="w13" c="w" pws="yes">an</w>
<w id="w16" c="hyw" pws="yes">ice-cream</w><w id="w25" pws="no" sb="true" c=".">.</w></s>
<s id="s2"><w id="w27" c="w" pws="yes">He</w> <w id="w30" c="w" pws="yes">dropped</w>
<w id="w38" c="w" pws="yes">it</w><w id="w40" pws="no" sb="true" c=".">.</w></s></p>
is input to the first step, its output looks like this:
Mr. Bean had an ice-cream .
He dropped it .
and this is the format that the C&C POS tagger requires.
Step 3: pos -model $model 2>$tmp-ccposerr
The third step is the one that actually runs the C&C POS tagger. The
pos command has a -model option and the argument to that
option is provided by the $model variable which is set by the
-m option of the postag script, as described above. The
2>$tmp-ccposerr ensures that all C&C messages are written to a
temporary file rather than to the terminal. If the input to this step
is the output of the previous step shown above, the output of the
tagger is this:
Mr.|NNP Bean|NNP had|VBD an|DT ice-cream|NN .|.
He|PRP dropped|VBD it|PRP .|.
Here each token is paired with its POS tag following the ‘|’
separator. The POS tag information in this output now needs to be merged
back in with the original document.
Step 4: lxconvert -r -q s -s $lib/pos.cnv -x $tmp-in
The fourth and final step in the postag component uses
lxconvert with the same stylesheet as before (-s $lib/pos.cnv)
to pair the C&C output file with the original input which was copied
to the temporary file, $tmp-in, in step 1. The -x option to
lxconvert identifies this original file. The -r option tells
lxconvert to use read mode so that it follows the rules for
reading C&C output (so as to cause the POS tags to be added as the
value of the p attribute on <w> elements). The query again
identifies <s> elements as the target of the rules. For the
example above which was output from the previous step, the output of
this step is as follows:
<p><s id="s1"><w pws="yes" c="abbr" id="w0" p="NNP">Mr.</w>
<w pws="yes" c="w" id="w4" p="NNP">Bean</w> <w pws="yes" c="w" id="w9" p="VBD">had</w>
<w pws="yes" c="w" id="w13" p="DT">an</w> <w pws="yes" c="hyw" id="w16" p="NN">ice-cream</w>
<w c="." sb="true" pws="no" id="w25" p=".">.</w></s>
<s id="s2"><w pws="yes" c="w" id="w27" p="PRP">He</w>
<w pws="yes" c="w" id="w30" p="VBD">dropped</w> <w pws="yes" c="w" id="w38" p="PRP">it</w>
<w c="." sb="true" pws="no" id="w40" p=".">.</w></s></p>
The lemmatise Component
Overview
The lemmatise component is a Unix shell script called with no
arguments. Input is read from standard input and output is to standard
output.
The lemmatise component computes information about the stem of
inflected words: for example, the stem of peas is pea and the stem
of had is have. In addition, the verbal stem of nouns and
adjectives which derive from verbs is computed: for example, the
verbal stem of arguments is argue. The lemma of a noun, verb or
adjective is encoded as the value of the l attribute on <w>
elements. The verbal stem of a noun or adjective is encoded as the
value of the vstem attribute on <w> elements.
The input to lemmatise is a document which has been processed by
tokenise and postag and which therefore contains <p>,
<s>, and <w> elements with POS tags encoded in the p
attribute of <w> elements. Since lemmatisation is only applied to
nouns, verbs and verb forms which have been tagged as adjectives, the
syntactic category of the word is significant — thus the lemmatise
component must be applied after the postag component and not
before. When the following is passed through tokenise, postag and
lemmatise:
<document>
<text>
<p>
The planning committee were always having big arguments.
The children have frozen the frozen peas.
</p>
</text>
</document>
it is output like this (again modulo white space):
<document>
<text>
<p>
<s id="s1"><w p="DT" id="w3" c="w" pws="yes">The</w>
<w p="NN" id="w7" c="w" pws="yes" l="planning" vstem="plan">planning</w>
<w p="NN" id="w16" c="w" pws="yes" l="committee">committee</w>
<w p="VBD" id="w26" c="w" pws="yes" l="be">were</w>
<w p="RB" id="w31" c="w" pws="yes">always</w>
<w p="VBG" id="w38" c="w" pws="yes" l="have">having</w>
<w p="JJ" id="w45" c="w" pws="yes">big</w>
<w p="NNS" id="w49" c="w" pws="yes" l="argument" vstem="argue">arguments</w>
<w p="." id="w58" pws="no" sb="true" c=".">.</w></s>
<s id="s2"><w p="DT" id="w60" c="w" pws="yes">The</w>
<w p="NNS" id="w64" c="w" pws="yes" l="child">children</w>
<w p="VBP" id="w73" c="w" pws="yes" l="have">have</w>
<w p="VBN" id="w78" c="w" pws="yes" l="freeze">frozen</w>
<w p="DT" id="w85" c="w" pws="yes">the</w>
<w p="JJ" id="w89" c="w" pws="yes" l="frozen" vstem="freeze">frozen</w>
<w p="NNS" id="w96" c="w" pws="yes" l="pea">peas</w>
<w p="." id="w100" pws="no" sb="true" c=".">.</w></s>
</p>
</text>
</document>
The lemmatiser called by the lemmatise script is morpha
(Minnen, Carroll, and Pearce 2000 [4]). We have included the relevant
binary and verb stem list from the release at
http://www.informatics.susx.ac.uk/research/groups/nlp/carroll/morph.html
with the permission of the authors. The binary of morpha, which in
this distribution is located at TTT2/bin/morpha, is a copy of
morpha.ix86_linux from the tar file morph.tar.gz. The resource
file, verbstem.list, which in this distribution is located in the
TTT2/lib/lemmatise/ directory is copied from the same tar
file. The morpha software is free for research purposes.
Note that the lemmatise script is similar to the postag script
in that it is a wrapper for a particular non-XML based program. It
converts the input XML to the input format of the lemmatiser, invokes
the lemmatiser, and then merges its output back into the XML
representation. It is possible to make changes to the script and the
conversion files in order to plug out the morpha lemmatiser and
replace it with another. The pipeline does a little more than just
wrap morpha, however, because it also computes the vstem
attribute on certain nouns and adjectives (see step 4 in the next
section). In doing this it uses a lexicon of information about the
verbal stem of nominalisations (e.g. the stem of argument is
argue). This lexicon, TTT2/lib/lemmatise/umls.lex, is derived
from the file in the 2007 UMLS SPECIALIST lexicon distribution [5].
The lemmatise script
In the early part of the script the $lib variable is defined to
point to TTT2/lib/lemmatise/ which is the location of the resource
files used by the lemmatise pipeline. The remainder of the script
contains the sequence of processing steps piped together that
constitute the lemmatise pipeline.
The lemmatise pipeline
1. cat >$tmp-in

2. lxconvert -w -q w -s $lib/lemmatise.cnv <$tmp-in |

3. morpha -f $lib/verbstem.list |

4. lxconvert -r -q w -s $lib/lemmatise.cnv -x $tmp-in
Step 1: cat >$tmp-in
The first step in the pipeline copies the input to the temporary file
$tmp-in. This is so that it can both be converted to morpha
input format as well as retained as the file that the morpha
output will be merged with.
Step 2: lxconvert -w -q w -s $lib/lemmatise.cnv <$tmp-in
The second step uses lxconvert to convert $tmp-in into an
appropriate format for input to the morpha lemmatiser (one or
sometimes two word_postag pairs per line). The -s option instructs
it to use the TTT2/lib/lemmatise/lemmatise.cnv stylesheet, while
the -q w query makes it focus on <w> elements. (The component
will therefore work on any file where words are encoded as <w>
elements and POS tags are encoded in the attribute p on <w>.)
The -w option makes it work in write mode so that it follows the
rules for writing morpha input format. If the following postag
output:
<p>
<s id="s1">
<w pws="yes" c="w" id="w3" p="DT">The</w> <w pws="yes" c="w" id="w7" p="NN">planning</w>
<w pws="yes" c="w" id="w16" p="NN">committee</w> <w pws="yes" c="w" id="w26" p="VBD">were</w>
<w pws="yes" c="w" id="w31" p="RB">always</w> <w pws="yes" c="w" id="w38" p="VBG">having</w>
<w pws="yes" c="w" id="w45" p="JJ">big</w> <w pws="yes" c="w" id="w49" p="NNS">arguments</w>
<w c="." sb="true" pws="no" id="w58" p=".">.</w>
</s>
<s id="s2">
<w pws="yes" c="w" id="w60" p="DT">The</w> <w pws="yes" c="w" id="w64" p="NNS">children</w>
<w pws="yes" c="w" id="w73" p="VBP">have</w> <w pws="yes" c="w" id="w78" p="VBN">frozen</w>
<w pws="yes" c="w" id="w85" p="DT">the</w> <w pws="yes" c="w" id="w89" p="JJ">frozen</w>
<w pws="yes" c="w" id="w96" p="NNS">peas</w><w c="." sb="true" pws="no" id="w100" p=".">.</w>
</s>
</p>
is input to the first step, its output looks like this:
planning_NN planning_V
committee_NN
were_VBD
having_VBG
big_JJ
arguments_NNS
children_NNS
have_VBP
frozen_VBN
frozen_JJ frozen_V
peas_NNS
Each noun, verb or adjective is a placed on a line and its POS tag is
appended after an underscore. Where a noun or an adjective ends with a
verbal inflectional ending, a verb instance of the same word is
created (i.e. planning_V, frozen_V ) in order that
morpha’s output for the verb can be used as the value for the
vstem attribute.
Step 3: morpha -f $lib/verbstem.list
The third step is the one that actually runs morpha. The
morpha command has a -f option to provide a path to the
verbstem.list resource file that it uses. If the input to this
step is the output of the previous step shown above, the output of
morpha is this:
planning plan
committee
be
have
big
argument
child
have
freeze
frozen freeze
pea
Here it can be seen how the POS tag affects the performance of the lemmatiser. The lemma of planning is planning when it is a noun but plan when it is a verb. Similarly, the lemma of frozen is frozen when it is an adjective but freeze when it is a verb. Irregular forms are correctly handled (children:child, frozen:freeze).
Step 4: lxconvert -r -q w -s $lib/lemmatise.cnv -x $tmp-in
The fourth and final step in the lemmatise component uses
lxconvert with the same stylesheet as before (-s
$lib/lemmatise.cnv) to pair the morpha output file with the
original input which was copied to the temporary file, $tmp-in, in
step 1. The -x option to lxconvert identifies this original
file. The -r option tells lxconvert to use read mode so that
it follows the rules for reading morpha output. The query again
identifies <w> elements as the target of the rules. For the
example above which was output from the previous step, the output of
this step is as follows (irrelevant attributes suppressed):
<p><s><w p="DT">The</w> <w p="NN" l="planning" vstem="plan">planning</w>
<w p="NN" l="committee">committee</w> <w p="VBD" l="be">were</w>
<w p="RB">always</w> <w p="VBG" l="have">having</w> <w p="JJ">big</w>
<w p="NNS" l="argument" vstem="argue">arguments</w><w p=".">.</w></s>
<s><w p="DT">The</w> <w p="NNS" l="child">children</w>
<w p="VBP" l="have">have</w> <w p="VBN" l="freeze">frozen</w>
<w p="DT">the</w> <w p="JJ" l="frozen" vstem="freeze">frozen</w>
<w p="NNS" l="pea">peas</w><w p=".">.</w></s></p>
Here the lemma is encoded as the value of l and, where a second
verbal form was input to morpha (planning, frozen as an
adjective), the output becomes the value of the vstem
attribute. Whenever the lemma of a noun can be successfully looked up
in the nominalisation lexicon (TTT2/lib/lemmatise/umls.lex), the
verbal stem is encoded as the value of vstem (argument:argue). The
relevant entry from TTT2/lib/lemmatise/umls.lex is this:
<lex word="argument" stem="argue"/>
The nertag Component
Overview
The nertag component is a Unix shell script called with no
arguments. Input is read from standard input and output is to standard
output.
The nertag component is a rule-based named entity recogniser which
recognises and marks up certain kinds of named entity: numex (sums of
money and percentages), timex (dates and times) and enamex (persons,
organisations and locations). These are the same entities as those
used for the MUC7 named entity evaluation (Chinchor 1998) [6]. (In
addition nertag also marks up some miscellaneous entities such as
urls.)
Unlike the other components, nertag has a more complex structure
where it makes calls to subcomponent pipelines which are also located in
the TTT2/scripts directory. Figure The nertag pipeline shows the structure of
the nertag pipeline.
The nertag pipeline
The input to nertag is a document which has been processed by
tokenise, postag and lemmatise and which therefore contains
<p>, <s>, and <w> elements and the attributes p, l and
vstem on the <w> elements. The rules identify sequences of words
which are entities and wrap them with the elements <numex>, <timex>
and <enamex>, with subtypes encoded as the value of the type
attribute. For example, the following might be input to a sequence of
tokenise, postag and nertag.
<document>
<text>
<p>
Peter Johnson, speaking in
London yesterday
afternoon, said that profits for
ABC plc were up
5% to $17 million.
</p>
</text>
</document>
The output is a relatively unreadable XML document where all the <p>,
<s>, and <w> elements and attributes described in the previous
sections have been augmented with further attributes and where
<numex>, <timex> and <enamex> elements have been added. For
clarity we show the output below after <w> and <phr> mark up has
been removed using the command lxreplace -q w|phr. Removing
extraneous mark-up in this way and at this point might be appropriate if
named entity recognition was the final aim of the processing. If further
processing such as chunking is to be done then the <w> and <phr>
mark-up must be retained.
<document>
<text>
<p>
<s id="s1">><enamex type="person">Peter Johnson</enamex>, speaking in
<enamex type="location">London</enamex> <timex type="date">yesterday</timex>
<timex type="time">afternoon</timex>, said that profits for
<enamex type="organization">ABC plc</enamex> were up
<numex type="percent">5%</numex> to <numex type="money">$17 million</numex>.</s>
</p>
</text>
</document>
The nertag script
In the early part of the script the $lib variable is defined to
point to TTT2/lib/nertag/ which is the location of the resource
files used by the nertag pipeline. The remainder of the script
contains a sequence of processing steps piped together:
1. $here/scripts/numtimex |

2. $here/scripts/lexlookup |

3. $here/scripts/enamex |
($here is defined in the setup as the TTT2 directory). Unlike
previous components, these steps are calls to subcomponents which are
themselves shell scripts containing pipelines. Thus the nertag
process is sub-divided into three subcomponents, numtimex to
identify and mark up <numex> and <timex> elements, lexlookup to
apply dictionary lookup for names and, finally, enamex `` which marks
up ``<enamex> elements taking into account the output of lexlookup.
The following subsections describe each of these subcomponents in turn.
Note that the lxtransduce grammars used in the numtimex
subcomponent are updated versions of the grammars used in Mikheev,
Grover, and Moens (1998) [7] and previously distributed in the original
LT-TTT distribution. The output of numtimex is therefore of
relatively high quality. The other two subcomponents are new for this
release and the enamex rules have not been extensively tested or
tuned.
The numtimex script
In the early part of the script the $lib variable is defined to
point to TTT2/lib/nertag/ which is the location of the resource
files used by the numtimex pipeline. The remainder of the script
contains the sequence of processing steps piped together that constitute
the numtimex pipeline.
The numtimex pipeline
1. lxtransduce -q s -l lex=$lib/numbers.lex $lib/numbers.gr |

2. lxreplace -q "phr/phr" |

3. lxreplace -q "phr[w][count(node())=1]" -t "&children;" |

4. lxtransduce -q s -l lex=$lib/currency.lex $lib/numex.gr |

5. lxreplace -q "phr[not(@c='cd') and not(@c='yrrange') and not(@c='frac')]" |

6. lxtransduce -q s -l lex=$lib/timex.lex -l numlex=$lib/numbers.lex $lib/timex.gr |

7. lxreplace -q "phr[not(.~' ')]" -t
   "<w><xsl:apply-templates select='w[1]/@*'/>&attrs;<xsl:value-of select=’.’/></w>"
Step 1: lxtransduce -q s -l lex=$lib/numbers.lex $lib/numbers.gr
Numerical expressions are frequent subparts of <numex> and <timex>
entities so the first step in the pipeline identifies and marks up a
variety of numerical expressions so that they are available for later
stages of processing. This step uses lxtransduce with the rules in
the numbers.gr grammar file and uses the query -q s so as to
process the input sentence by sentence. It consults a lexicon of number
words (numbers.lex) which contains word entries for numbers
(e.g. eighty, billion). If the following sentence is processed by step 1
after first having been put through tokenise and postag (and
lemmatise but this doesn’t affect numtimex and is disregarded
here):
The third announcement said that the twenty-seven billion euro deficit
was discovered two and a half months ago.
the output will be this (again modulo white space):
<p><s id="s1"><w p="DT" id="w1" c="w" pws="yes">The</w>
<phr c="ord"><w p="JJ" id="w5" c="ord" pws="yes">third</w></phr>
<w p="NN" id="w11" c="w" pws="yes">announcement</w> <w p="VBD" id="w24" c="w" pws="yes">said</w>
<w p="IN" id="w29" c="w" pws="yes">that</w> <w p="DT" id="w34" c="w" pws="yes">the</w>
<phr c="cd"><w p="NN" id="w38" c="cd" pws="yes">twenty</w><w p=":" id="w44" pws="no" c="hyph">-</w>
<w p="CD" id="w45" pws="no" c="cd">seven</w> <w p="CD" id="w51" c="cd" pws="yes">billion</w></phr>
<w p="NN" id="w59" c="w" pws="yes">euro</w> <w p="NN" id="w64" c="w" pws="yes">deficit</w>
<w p="VBD" id="w72" c="w" pws="yes">was</w> <w p="VBN" id="w76" c="w" pws="yes">discovered</w>
<phr c="cd"><w p="CD" id="w87" c="cd" pws="yes">two</w>
<w p="CC" id="w91" c="w" pws="yes">and</w>
<phr c="frac"><w p="DT" id="w95" c="w" pws="yes">a</w>
<w p="JJ" id="w97" c="w" pws="yes">half</w></phr></phr>
<w p="NNS" id="w102" c="w" pws="yes">months</w> <w p="RB" id="w109" c="w" pws="yes">ago</w>
<w p="." id="w112" pws="no" sb="true" c=".">.</w></s></p>
This output can be seen more clearly if we remove the <w> elements:
<p><s id="s1">The <phr c="ord">third</phr> announcement said that the
<phr c="cd">twenty-seven billion</phr> euro deficit was discovered
<phr c="cd">two and <phr c="frac">a half</phr></phr> months ago.</s></p>
Subsequent grammars are able to use such phr elements when building
larger entity expressions.
Step 2: lxreplace -q phr/phr
The second step uses lxreplace to remove embedded <phr> mark-up so
that numerical phrases don’t have unnecessary internal structure:
<p><s id="s1">The <phr c="ord">third</phr> announcement said that the
<phr c="cd">twenty-seven billion</phr> euro deficit was discovered
<phr c="cd">two and a half</phr> months ago.</s></p>
Step 3: lxreplace -q phr[w][count(node())=1] -t &children;
The third step makes another minor adjustment to the <phr> mark-up.
The grammar will sometimes wrap single words as <phr> elements
(e.g. the third in the current example) and, since this is unnecessary,
in this step lxreplace is used to remove any <phr> tag where there
is a single <w> daughter. Thus the current example is changed to this:
<p><s id="s1">The third announcement said that the
<phr c="cd">twenty-seven billion</phr> euro deficit was discovered
<phr c="cd">two and a half</phr> months ago.</s></p>
Step 4: lxtransduce -q s -l lex=$lib/currency.lex $lib/numex.gr
The fourth step of the pipeline recognises <numex> entities using
the rules in numex.gr. It is this step which is responsible for
the two instances of <numex> mark-up in the example in section
nertag Overview. For the current example, the
output of this step (after removing <w> elements) is this:
<p><s id="s1">The third announcement said that the
<numex type="money"><phr c="cd">twenty-seven billion</phr> euro</numex>
deficit was discovered <phr c="cd">two and a half</phr> months ago.</s></p>
The grammar makes use of the currency.lex lexicon which contains a
list of the names of a wide range of currencies. Using this information
it is able to recognise the money <numex> element.
Step 5: lxreplace -q phr[not(@c=’cd’) and not(@c=’yrrange’) and not(@c=’frac’)]
It is not intended that <phr> mark-up should be part of the final
output of a pipeline—it is only temporary mark-up which helps later
stages and it should be deleted as soon as it is no longer needed. At
this point, <phr> elements with cd, frac and yrrange as
values for the c attribute are still needed but other <phr>
elements are not. This step removes all <phr> elements which are not
still needed.
Step 6: lxtransduce -q s -l lex=$lib/timex.lex -l numlex=$lib/numbers.lex $lib/timex.gr
The sixth step of the pipeline recognises <timex> entities using
the rules in timex.gr. It is this step which is responsible for
the two instances of <timex> mark-up in the example in section
Overview. For the current example, the output of this step
(after removing <w> elements) is this:
<p><s id="s1">The third announcement said that the
<numex type="money"><phr c="cd">twenty-seven billion</phr> euro</numex>
deficit was discovered
<timex type="date"><phr c="cd">two and a half</phr> months ago</timex>.
</s></p>
The grammar makes use of two lexicons, timex.lex, which contains
entries for the names of days, months, holidays, time zones etc., and
numbers.lex. In addition to examples of the kind shown here, the
timex rules recognise standard dates in numerical or more verbose form
(08/31/07, 31.08.07, 31st August 2007 etc.), times (half past three,
15:30 GMT etc.) and other time related expressions (late Tuesday night,
Christmas, etc.).
Step 7: lxreplace -q phr[not(.\sim’ ’)] -t <w><xsl:apply-templates select=’w[1]/@*’/>&attrs;<xsl:value-of select=’.’/></w>
By this point the only <phr> mark-up that will still be needed is that
around multi-word phrases, i.e. those containing white space
(e.g. three quarters). Where there is no white-space, this step
creates a <w> element instead of the original <phr>. The new <w>
element acquires first the attributes of the first <w> in the old
<phr> (’w[1]/@*’) and then the attributes of the old <phr>
itself (&attrs;) — since both have a c attribute, the one from the
<phr> is retained. The text content of the embedded <w> elements are
copied but the embedded <w> element tags are not. The following is an
example of input to this step. Note that the line break between three
and - is there for layout purposes and does not exist in the actual
input.
<p>
<s id="s1"><phr c="cd"><w pws="yes" c="cd" id="w1" p="CD">two</w>
<w pws="yes" c="cd" id="w5" p="CD">thousand</w></phr><w c="cm" pws="no" id="w13" p=":">;</w>
<phr c="frac"><w pws="yes" c="cd" id="w15" p="CD">three</w>
<w c="hyph" pws="no" id="w20" p=":">-</w><w c="w" pws="no" id="w21" p="NNS">quarters</w></phr>
</s></p>
The output for this example is this:
<p>
<s id="s1"><phr c="cd"><w p="CD" id="w1" c="cd" pws="yes">two</w>
<w p="CD" id="w5" c="cd" pws="yes">thousand</w></phr><w p=":" id="w13" pws="no" c="cm">;</w>
<w p="CD" id="w15" c="frac" pws="yes">three-quarters</w></s>
</p>
The result is that three-quarters is now recognised as a single word
token, rather than the three from before. This brings the mark-up more
into line with standard tokenisation practise which does not normally
split hyphenated numbers: subsequent steps can therefore assume standard
tokenisation for such examples. The two thousand example is left
unchanged because standard tokenisation treats this as two tokens.
However, since we have computed that together two and thousand
constitute a numerical phrase, we keep the <phr> mark-up for future
components to benefit from. For example a noun group chunking rule can
describe a numeric noun specifier as either a <phr c=cd> or a
<w p=CD> instead of needing to make provision for one or more numeric
words in specifier position. If, however, the numtimex component is
to be the last in a pipeline and no further LT-TTT2 components are to be
used, either the last step can be changed to remove all <phr> mark-up
or the call to numtimex can be followed by a call to lxreplace
to remove <phr> elements.
The lexlookup script
In the early part of the script the $lib variable is defined to
point to TTT2/lib/nertag/ which is the location of the resource
files used by the lexlookup pipeline. The remainder of the script
contains the sequence of processing steps piped together that constitute
the lexlookup pipeline.
The lexlookup pipeline
1. lxtransduce -q s -a firstname $lib/lexlookup.gr |

2. lxtransduce -q s -a common $lib/lexlookup.gr |

3. lxtransduce -q s -a otherloc $lib/lexlookup.gr |

4. lxtransduce -q s -a place $lib/lexlookup.gr
Step 1: lxtransduce -q s -a firstname $lib/lexlookup.gr
This step uses lexlookup.gr to mark up words which are known
forenames. The -a option to lxtransduce instructs it to apply
the firstname rule:
<rule name="firstname" attrs="pername='true'">
  <first>
    <lookup match="w[@p~'^N' and .~'^[A-Z]']" lexicon="fname" phrase="true"/>
    <lookup match="w[@p~'^N' and .~'^[A-Z]']" lexicon="mname" phrase="true"/>
  </first>
</rule>
This rule does look-up against two lexicons of female and male first names where the locations of the lexicons are defined in the grammar like this:
<lexicon name="fname" href="femalefirstnames.lex"/>
<lexicon name="mname" href="malefirstnames.lex"/>
i.e. the lexicons are expected to be located in the same directory as the grammar itself. The lexicons are derived from lists at http://www.ssa.gov/OACT/babynames/.
This step adds the attribute pername=true to words which match so
that
<w p="NNP">Peter</w>
becomes
<w p="NNP" pername="true">Peter</w>.
Step 2: lxtransduce -q s -a common $lib/lexlookup.gr
This step uses lexlookup.gr to identify capitalised nominals which
are known to be common words. The -a option to lxtransduce
instructs it to apply the common rule:
<rule name="common" attrs="common='true'">
  <lookup match="w[@p~'^N' and .~'^[A-Z]']" lexicon="common" phrase="true"/>
</rule>
This rule does look-up against a lexicon of common words where the location of the lexicon is defined in the grammar like this:
<lexicon name="common" href="common.mmlex"/>
i.e. the lexicon is expected to be located in the same directory as the
grammar itself. The common word lexicon is derived from an intersection
of lower case alphabetic entries in Moby Part of Speech
(http://www.gutenberg.org/etext/3203) and a list of frequent common
words derived from docfreq.gz available from the Berkeley Web Term
Document Frequency and Rank site (http://elib.cs.berkeley.edu/docfreq/).
Because this is a very large lexicon (25,307 entries) it is more
efficient to use a memory-mapped version (with a .mmlex extension)
since the default mechanism for human-readable lexicons loads the entire
lexicon into memory and incurs a significant start-up cost if the
lexicon is large. Memory-mapped lexicons are derived from standard
lexicons using the LT-XML2 program, lxmmaplex. The source of
common.mmlex, common.lex, is located in the TTT2/lib/nertag
directory and can be searched. If it is changed, the memory-mapped
version needs to be recreated.
The effect of step 2 is to add the attribute common=true to
capitalised nominals which match so that
<w p="NNP">Paper</w>
becomes
<w p="NNP" common="true">Paper</w>.
Step 3: lxtransduce -q s -a otherloc $lib/lexlookup.gr
This step uses lexlookup.gr to identify the names of countries
(e.g. France) as well as capitalised words which are adjectives or
nouns relating to place names (e.g. French). The -a option to
lxtransduce instructs it to apply the otherloc rule:
<rule name="otherloc">
  <first>
    <lookup match="w[.~'^[A-Z]']"
            lexicon="countries" phrase="true" attrs="country='true'"/>
    <lookup match="w[@p~'^[NJ]' and .~'^[A-Z]']"
            lexicon="locadj" phrase="true" attrs="locadj='true'"/>
  </first>
</rule>
The first lookup in the rule accesses the lexicon of country names while the second accesses the lexicon of locational adjectives, where the location of the lexicons are defined in the grammar like this:
<lexicon name="locadj" href="locadj.lex"/>
<lexicon name="countries" href="countries.lex"/>
i.e. the lexicons are expected to be located in the same directory as the grammar itself. The lexicons are derived from lists at http://en.wikipedia.org/wiki/United_Nations_member_states and http://en.wikipedia.org/wiki/List_of_adjectival_forms_of_place_names.
The effect of step 3 is to add the attributes country=true and
locadj=true to capitalised words which match so that
<w p="NN">Portuguese</w> and <w p="NNP">Brazil</w>
become
<w p="NN" locadj="true">Portuguese</w> and <w p="NNP"
country="true">Brazil</w>.
Step 4: lxtransduce -q s -a place $lib/lexlookup.gr
The final step uses lexlookup.gr to identify the names of places.
The -a option to lxtransduce instructs it to apply the place
rule:
<rule name="place">
  <first>
    <ref name="place-multi"/>
    <ref name="place-single"/>
  </first>
</rule>
This accesses two rules, one for multi-word place names and one for
single word place names. For multi-word place names, the assumption is
that these are unlikely to be incorrect, so the rule wraps them as
<enamex type=location>:
<rule name="place-multi" wrap="enamex" attrs="type='location'">
  <and>
    <query match="w[.~'^[A-Z]']"/>
    <first>
      <lookup match="w" lexicon="alexm" phrase="true"/>
      <lookup match="w[@p~'^N' and .~'^[A-Z]+$']"
              lexicon="alexm" case="no" phrase="true"/>
    </first>
  </and>
</rule>
Single word place names are highly likely to be ambiguous so the rule
for these just adds the attribute locname=single to words which
match.
<rule name="place-single" attrs="locname='single'">
  <and>
    <query match="w[.~'^[A-Z]']"/>
    <first>
      <lookup match="w" lexicon="alexs" phrase="true"/>
      <lookup match="w[@p~'^N' and .~'^[A-Z][A-Z][A-Z][A-Z]+$']"
              lexicon="alexs" case="no" phrase="true"/>
    </first>
  </and>
</rule>
These rules access lexicons of multi-word and single-word place names, where the location of the lexicons are defined in the grammar like this:
<lexicon name="alexm" href="alexandria-multi.mmlex"/>
<lexicon name="alexs" href="alexandria-single.mmlex"/>
i.e. the lexicons are expected to be located in the same directory as
the grammar itself. The source of the lexicons is the Alexandria Digital
Library Project Gazetteer (http://legacy.alexandria.ucsb.edu/gazetteer/),
specifically, the name list, which can be downloaded from
http://legacy.alexandria.ucsb.edu/downloads/gazdata/adlgaz-namelist-20020315.tar [8].
Various filters have been applied to the list to derive the two separate
lexicons, to filter common words out of the single-word lexicon and to
discard certain kinds of entries. As with the common word lexicon, we
use memory-mapped versions of the two lexicons because they are very
large (1,797,719 entries in alexandria-multi.lex and 1,634,337
entries in alexandria-single.lex).
The effect of step 4 is to add <enamex> mark-up or locname=single
to words which match so that
<w p="NNP">Manhattan</w>
becomes
<w p="NNP" locname="single">Manhattan</w>
and
<w p="NNP">New</w> <w p="NNP">York</w>
becomes
<enamex type="location"><w p="NNP">New</w> <w p="NNP">York</w></enamex>.
Note that because the rules in lexlookup.gr are applied in a
sequence of calls rather than all at once, a word may be affected by
more than one of the look-ups. See, for example, the words Robin,
Milton and France in the output for Robin York went to the British
Rail office in Milton Keynes to arrange a trip to France.:
<s><w common="true" pername="true">Robin</w> <w locname="single">York</w>
<w>went</w> <w>to</w> <w>the</w> <w locadj="true">British</w>
<w common="true">Rail</w> <w>office</w> <w>in</w>
<enamex type="location"><w pername="true">Milton</w> <w>Keynes</w></enamex>
<w>to</w> <w>arrange</w> <w>a</w> <w>trip</w> <w>to</w>
<w locname="single" country="true">France</w><w>.</w></s>
The new attributes on <w> elements are used by the rules in the
<enamex> component, while the multi-word location mark-up prevents
these entities from being considered by subsequent rules. Thus Milton
Keynes will not be analysed as a person name.
The enamex script
In the early part of the script the $lib variable is defined to
point to TTT2/lib/nertag/ which is the location of the resource
files used by the enamex pipeline. The remainder of the script
contains the sequence of processing steps piped together that constitute
the enamex pipeline.
The enamex pipeline
1. lxtransduce -q s -l lex="$lib/enamex.lex" $lib/enamex.gr |

2. lxreplace -q "enamex/enamex" > $tmp-pre-otf

3. $here/scripts/onthefly <$tmp-pre-otf >$tmp-otf.lex

4. lxtransduce -q s -l lex=$tmp-otf.lex $lib/enamex2.gr <$tmp-pre-otf |

5. lxreplace -q subname
Step 1: lxtransduce -q s -l lex=$lib/enamex.lex $lib/enamex.gr
Step 1 in the enamex pipeline applies the main grammar,
enamex.gr, which marks up <enamex> elements of type person,
organization and location, as well as miscellaneous entities
such as urls. An input like this:
<p>
Mr. Joe L. Bedford (www.jbedford.org) is President of JB Industries Inc.
Bedford has an office in Paris, France.
</p>
is output as this (<w> mark-up suppressed):
<p>
<s id="s1"><enamex type="person">Mr. Joe L. Bedford</enamex> (<url>www.jbedford.org</url>)
is President of <enamex type="organization">JB Industries Inc</enamex>.</s>
<s id="s2">Bedford has an office in Paris, <enamex type="location">France</enamex>.</s>
</p>
At this stage, single-word place names are not marked up as they can be
very ambiguous — in this example Bedford is a person name, not a place
name. The country name France, has been marked up, however, because
the lexlookup component marked it as a country and country
identification is more reliable.
Step 2: lxreplace -q enamex/enamex > $tmp-pre-otf
Multi-word locations are identified during lexlookup and can form
part of larger entities, with the result that it is possible for step 1
to result in embedded marked, e.g.:
<enamex type="organization"><enamex type="location">Bishops
Stortford</enamex> Town Council</enamex>
Since embedded mark-up is not consistently identified, it is removed.
This step applies lxreplace to remove inner <enamex> mark-up. The
output of this step is written to the temporary file $tmp-pre-otf
because it feeds into the creation of an ‘on the fly’ lexicon which is
created from the first pass of enamex in order to do a second pass
matching repeat examples of first pass <enamex> entities.
Step 3: $here/scripts/onthefly <$tmp-pre-otf >$tmp-otf.lex
The temporary file from the last step, $tmp-pre-otf, is input to the
script TTT2/scripts/onthefly (described in Sections The onthefly script and
The onthefly pipeline) which creates a small lexicon containing the <enamex>
elements which have already been found plus certain variants of them. If
the example illustrating step 1 is input to TTT2/scripts/onthefly,
the lexicon which is output is as follows:
<lexicon>
<lex word="Bedford"><cat>person</cat></lex>
<lex word="France"><cat>location</cat></lex>
<lex word="JB Industries Inc"><cat>organization</cat></lex>
<lex word="Joe"><cat>person</cat></lex>
<lex word="Joe Bedford"><cat>person</cat></lex>
<lex word="Joe L. Bedford"><cat>person</cat></lex>
</lexicon>
Step 4: lxtransduce -q s -l lex=$tmp-otf.lex $lib/enamex2.gr <$tmp-pre-otf
The ‘on the fly’ lexicon created at step 3 is used in step 4 with a
second enamex grammar, enamex2.gr. This performs lexical lookup
against the lexicon and in our current example this leads to the
recognition of Bedford in the second sentence as a person rather than
a place. The grammar contains a few other rules including one which
finally accepts single word placenames (<w locname=single>) as
locations — this results in Paris in the current example being marked
up.
Step 5: lxreplace -q subname
The final step of the enamex component (and of the nertag
component) is one which removes a level of mark-up that was created by
the enamex rules in the enamex.gr grammar, namely the element
<subname>. This was needed to control how a person name should be
split when creating the ‘on the fly’ lexicon, but it is no longer needed
at this stage. The final output of the nertag component for the
current example is this:
<p><s id="s1"><enamex type="person">Mr. Joe L. Bedford</enamex> (<url>www.jbedford.org</url>)
is President of <enamex type="organization">JB Industries Inc</enamex>.</s>
<s id="s2"><enamex type="person" subtype="otf">Bedford</enamex> has an office in
<enamex type="location">Paris</enamex>, <enamex type="location">France</enamex>.</s></p>
The onthefly script
This script uses the LT-XML2 programs to extract names from the first
pass of enamex and convert them into an ‘on the fly’ lexicon (the
lexicon $tmp-otf.lex referred to above). The conversion is achieved
through sequences of lxreplace and lxt as well as use of
lxsort and lxuniq. This is a useful example of how simple steps
using these programs can be combined together to create a more complex
program.
In the early part of the script the $lib variable is defined to
point to TTT2/lib/nertag/ which is the location of the resource
files used by the onthefly pipeline. The remainder of the script
contains the sequence of processing steps piped together that constitute
the onthefly pipeline.
The onthefly pipeline
 1. lxgrep -w lexicon
    enamex[@type='person' and not(subname[@type='fullname'])]
    |subname[@type='fullname']|enamex[@type='location']|enamex[@type='organization']" |

 2. lxreplace -q "enamex" -t "<name>\&attrs;\&children;</name>" |

 3. lxreplace -q "w/@*" |

 4. lxreplace -q "name/subname" -t "<w>\&children;</w>" |

 5. lxreplace -q "w/w" |

 6. lxreplace -q "lexicon/subname" -t "<name type='person'>\&children;</name>" |

 7. lxreplace -q "lexicon/*/text()" -r "normalize-space(.)" |

 8. lxreplace -q "w[.~'^(.|[A-Z]\.)$']" -t "<w init='yes'>\&children;</w>" |

 9. lxt -s $lib/expandlex.xsl |

10. lxreplace -q "w[position()``\ ``!``\ ``=1]" -t "<xsl:text> </xsl:text>\&this;" |

11. lxreplace -q w |

12. lxreplace -q "name[not(node())]" -t "" |

13. lxreplace -q name -t "<lex word='{.}'><cat><xsl:value-of select='@type'/></cat></lex>" |

14. lxt -s $lib/merge-lexicon-entries.xsl |

15. lxsort lexicon lex @word |

16. lxuniq lexicon lex @word |

17. lxsort lex cat . |

18. lxuniq lex cat .
Step 1
The first step uses lxgrep to extract location and organization
<enamex> elements as well as either full person <enamex> elements or
a relevant subpart of a name which contains a title. The input is a
document with <p>, <s>, <w>, and <numex>, <timex> and
<enamex> mark-up and the output of this call to lxgrep for the
previous Mr. Joe L. Bedford example is this:
<lexicon>
<subname type="fullname">
  <w pername="true" l="joe" id="w4" c="w" pws="yes" p="NNP" locname="single">Joe</w>
  <w l="bedford" id="w8" c="w" pws="yes" p="NNP" locname="single">Bedford</w>
</subname>
<enamex type="organization">
  <w l="jb" id="w51" c="w" pws="yes" p="NNP">JB</w>
  <w l="industry" id="w54" c="w" pws="yes" p="NNPS" common="true">Industries</w>
  <w l="inc" id="w65" c="w" pws="yes" p="NNP">Inc</w>
</enamex>
<enamex type="location">
  <w country="true" l="france" id="w102" c="w" pws="yes" p="NNP" locname="single">France</w>
</enamex>
</lexicon>
Steps 2–8
The next seven steps use lxreplace to gradually transform the
<enamex> and <subname> elements in the lxgrep output into
<name> elements: The <w> elements inside the <name> elements lose
their attributes and the white space between them is removed (because
the original white space in the source text may be irregular and include
newlines). In Step 8, <w> elements which are initials are given the
attribute init=yes so that they can be excluded from consideration
when variants of the entries are created. The output from these five
steps is this:
<lexicon>
<name type="person"><w>Joe</w><w init="yes">L.</w><w>Bedford</w></name>
<name type="organization"><w>JB</w><w>Industries</w><w>Inc</w></name>
<name type="location"><w>France</w></name>
</lexicon>
Step 9
Step 9 uses lxt with the stylesheet
TTT2/lib/nertag/expandlex.xsl to create extra variant entries for
person names. The output now looks like this:
<lexicon>
<name type="person"><w>Joe</w><w init="yes">L.</w><w>Bedford</w></name>
<name type="person"><w>Bedford</w></name>
<name type="person"><w>Joe</w></name>
<name type="person"><w>Joe</w></name>
<name type="person"><w>Bedford</w></name>
<name type="person"><w>Bedford</w></name>
<name type="person"><w>Joe</w><w>Bedford</w></name>
<name type="organization"><w>JB</w><w>Industries</w><w>Inc</w></name>
<name type="location"><w>France</w></name>
</lexicon>
The duplicates are a side-effect of the rules in the stylesheet and are removed before the end of the pipeline.
Steps 10–13
The next four steps use lxreplace to continue the transformation of
the <name> elements. Regular white space is inserted between the <w>
elements and then the <w> mark up is removed. Any empty <name>
elements are removed and the conversion to proper lxtransduce
lexicon format is done with the final lxreplace. The output now
looks like this:
<lexicon>
<lex word="Joe L. Bedford"><cat>person</cat></lex>
<lex word="Bedford"><cat>person</cat></lex>
<lex word="Joe"><cat>person</cat></lex>
<lex word="Joe"><cat>person</cat></lex>
<lex word="Bedford"><cat>person</cat></lex>
<lex word="Bedford"><cat>person</cat></lex>
<lex word="Joe Bedford"><cat>person</cat></lex>
<lex word="JB Industries Inc"><cat>organization</cat></lex>
<lex word="France"><cat>location</cat></lex>
</lexicon>
Step 14
At this stage there are still duplicates so this step uses lxt
with the stylesheet TTT2/lib/nertag/merge-lexicon-entries.xsl to
add to each entry the <cat> elements of all its duplicates. The
output from this step looks like this:
<lexicon>
<lex word="Joe L. Bedford"><cat>person</cat></lex>
<lex word="Bedford"><cat>person</cat><cat>person</cat><cat>person</cat></lex>
<lex word="Joe"><cat>person</cat><cat>person</cat></lex>
<lex word="Joe"><cat>person</cat><cat>person</cat></lex>
<lex word="Bedford"><cat>person</cat><cat>person</cat><cat>person</cat></lex>
<lex word="Bedford"><cat>person</cat><cat>person</cat><cat>person</cat></lex>
<lex word="Joe Bedford"><cat>person</cat></lex>
<lex word="JB Industries Inc"><cat>organization</cat></lex>
<lex word="France"><cat>location</cat></lex>
</lexicon>
Note that in this example, each entity is only of one type. In other examples, the same string may have been identified by the enamex grammar as belonging to different types in different contexts, for example, Prof. Ireland happens to work in Ireland. In this case the output at this stage looks like this:
<lexicon>
<lex word="Ireland"><cat>person</cat><cat>location</cat></lex>
<lex word="Ireland"><cat>person</cat><cat>location</cat></lex>
</lexicon>
Steps 15–18
The final four steps of the pipeline use lxsort and lxuniq to
remove duplicate entries and duplicate <cat> elements. The final
result for the running example is this:
<lexicon>
<lex word="Bedford"><cat>person</cat></lex>
<lex word="France"><cat>location</cat></lex>
<lex word="JB Industries Inc"><cat>organization</cat></lex>
<lex word="Joe"><cat>person</cat></lex>
<lex word="Joe Bedford"><cat>person</cat></lex>
<lex word="Joe L. Bedford"><cat>person</cat></lex>
</lexicon>
The chunk Component
Overview
The chunk component is a Unix shell script. Input is read from
standard input and output is to standard output. The script requires two
parameters supplied through -s and -f options. The -s option
specifies the style of output that is required with possible arguments
being: conll, flat, nested or none. The -f option
specifies the format of output with possible arguments being:
standoff, bio or inline.
The chunk component is a rule-based chunker which recognises and
marks up shallow syntactic groups such as noun groups, verb groups
etc. A description of an earlier version of the chunker can be found
at Grover and Tobin (2006) [9]. The earlier version only marked up
noun and verb groups while the current version also marks up
preposition, adjective, adverb and sbar groups. The first part of the
pipeline produces mark-up which is similar to, though not identical
to, the chunk mark-up in the CoNLL 2000 data (Tjong Kim Sang and
Buchholz 2000) [10]. This mark-up is then converted to reflect
different chunking styles and different formats of output through use
of the -s and -f parameters.
The output of the first part of the pipeline, when applied after tokenisation and POS tagging, converts this input:
In my opinion, this example hasn't turned out well.
to this output (whitespace altered):
<text>
<p><s id="s1">
<pg><w p="IN" pws="yes" id="w1">In</w></pg>
<ng>
  <w p="PRP$" pws="yes" id="w4">my</w>
  <w p="NN" pws="yes" id="w7" headn="yes">opinion</w>
</ng>
<w p="," pws="no" id="w14">,</w>
<ng>
  <w p="DT" pws="yes" id="w16">this</w>
  <w p="NN" pws="yes" id="w21" headn="yes">example</w>
</ng>
<vg tense="pres" voice="act" asp="perf" modal="no" neg="yes">
  <w p="VBZ" pws="yes" id="w29">has</w><w p="RB" pws="no" id="w32" neg="yes">n't</w>
  <w p="VBN" pws="yes" id="w36" headv="yes">turned</w>
  <w p="RP" pws="yes" id="w43">out</w>
</vg>
<rg><w p="RB" pws="yes" id="w47">well</w></rg>
<w p="." sb="true" pws="no" id="w51">.</w></s></p>
</text>
Note that <vg> elements have attributes indicating values for tense,
aspect, voice, modality and negation and that head verbs and nouns are
marked as headv=yes and headn=yes respectively. These attributes
are extra features which are not normally output by a chunker but which
are included in this one because it is relatively simple to augment the
rules for these features.
The effects of the different style and format options are described below.
The chunk rules require POS tagged input but can be applied before or
after lemmatisation. The chunk component would typically be applied
after the nertag component since the rules have been designed to
utilise the output of nertag; however, the rules do not require
nertag output and the chunker can be used directly after POS
tagging.
The chunk script
Since chunk is called with arguments, the early part of the script
is more complex than scripts with no arguments. The while and if
loops) set up the -s and -f options so that style and format
parameters can be provided when the component is called. For example,
the run script calls the chunk component in this way:
$here/scripts/chunk -s nested -f inline
In the early part of the script the $lib variable is defined to
point to TTT2/lib/chunk/ which is the location of the resource files
used by the chunk pipeline. The remainder of the script contains the
sequence of processing steps piped together that constitute the basic
chunk pipeline as well as conditional processing steps which format
the output depending on the the choice of values supplied to the -s
and -f parameters.
The chunk pipeline
1. lxtransduce -q s $lib/verbg.gr |

2. lxreplace -q "vg[w[@neg='yes']]" -t "<vg neg='yes'>&attrs;&children;</vg>" |

3. lxtransduce -q s $lib/noung.gr |

4. lxtransduce -q s -l lex=$lib/other.lex $lib/otherg.gr |

5. lxreplace -q "phr|@c" > $tmp-chunked
Step 1: lxtransduce -q s $lib/verbg.gr
The first step applies a grammar to recognise verb groups. The verb
groups are wrapped as <vg> elements and various values for attributes
encoding tense, aspect, voice, modality, negation and the head verb are
computed. For example, the verb group from the previous example is
output from this step as follows:
<vg modal="no" asp="perf" voice="act" tense="pres">
  <w id="w29" c="w" pws="yes" p="VBZ">has</w>
  <w neg="yes" id="w32" pws="no" c="w" p="RB">n't</w>
  <w headv="yes" id="w36" c="w" pws="yes" p="VBN">turned</w>
  <w id="w43" c="w" pws="yes" p="RP">out</w>
</vg>
The <vg> element contains the attributes tense, asp, voice
and modal while the headv attribute occurs on the head verb and
a neg attribute occurs on any negative words in the verb group.
Step 2: lxreplace -q vg[w[@neg=’yes’]] -t <vg neg=’yes’>&attrs;&children;</vg>
In the second step, information about negation is propagated from a
negative word inside a verb group to the enclosing <vg> element. Thus
the previous example now looks like this:
<vg tense="pres" voice="act" asp="perf" modal="no" neg="yes">
  <w p="VBZ" pws="yes" c="w" id="w29">has</w>
  <w p="RB" c="w" pws="no" id="w32" neg="yes">n't</w>
  <w p="VBN" pws="yes" c="w" id="w36" headv="yes">turned</w>
  <w p="RP" pws="yes" c="w" id="w43">out</w>
</vg>
Step 3: lxtransduce -q s $lib/noung.gr
In this step the noun group grammar is applied. Noun groups are
wrapped as <ng> elements and the head noun is marked with the
attribute headn=yes — see for example the two noun groups in the
current example in Section chunk Overview. In
the case of compounds, all the nouns in the compound are marked with
the headn attribute:
<ng>
  <w id="w1" c="w" pws="yes" p="DT">A</w>
  <w headn="yes" id="w3" c="w" pws="yes" p="NN">snow</w>
  <w headn="yes" id="w8" c="w" pws="yes" p="NN">storm</w>
</ng>
In the case of coordination, the grammar treats conjuncts as separate noun groups if possible:
<ng>
  <w p="JJ" pws="yes" c="w" id="w8">green</w>
  <w p="NNS" pws="yes" c="w" id="w14" headn="yes">eggs</w>
</ng>
<w p="CC" pws="yes" c="w" id="w19">and</w>
<ng>
  <w p="JJ" pws="yes" c="w" id="w23">blue</w>
  <w p="NN" pws="yes" c="w" id="w28" headn="yes">ham</w>
</ng>
but where a noun group seems to contain a coordinated head then there is
one noun group and all head nouns as well as conjunctions are marked as
headn=yes:
<ng>
  <w p="JJ" pws="yes" c="w" id="w8">green</w>
  <w p="NNS" pws="yes" c="w" id="w14" headn="yes">eggs</w>
  <w p="CC" pws="yes" c="w" id="w19" headn="yes">and</w>
  <w p="NN" pws="yes" c="w" id="w23" headn="yes">ham</w>
</ng>
In this particular case, there is a genuine ambiguity as to the scope of the adjective green depending on whether it is just the eggs that are green or both the eggs and the ham that are green. The output of the grammar does not represent ambiguity and a single analysis will be output which will sometimes be right and sometimes wrong. The output above gives green scope over both nouns and therefore gives the second reading. This is appropriate for this case but would probably be considered wrong for red wine and cheese.
The noun group grammar rules allow for the possibility that the text has
first been processed by the nertag component by defining <enamex>,
<numex> and <timex> elements as possible sub-parts of noun groups.
This means that the output of the noun group grammar may differ
depending on whether nertag has been applied or not. For example,
the nertag component identifies the Office for National Statistics
as an <enamex> element and this is then treated by the noun group
grammar as an <ng>:
<ng>
  <enamex type="organization">
    <w p="DT" pws="yes" id="w300">the</w>
    <w p="NNP" pws="yes" id="w304" common="true">Office</w>
    <w p="IN" pws="yes" id="w311">for</w>
    <w p="NNP" pws="yes" id="w315" common="true">National</w>
    <w p="NNP" pws="yes" id="w324" common="true">Statistics</w>
  </enamex>
</ng>
When nertag isn’t first applied, the chunker outputs the example as
a sequence of noun group, preposition group, noun group:
<ng>
  <w p="DT" pws="yes" id="w300">the</w>
  <w p="NNP" pws="yes" id="w304" headn="yes">Office</w>
</ng>
<pg>
  <w p="IN" pws="yes" id="w311">for</w>
</pg>
<ng>
  <w p="NNP" pws="yes" id="w315" headn="yes">National</w>
  <w p="NNP" pws="yes" id="w324" headn="yes">Statistics</w>
</ng>
Step 4: lxtransduce -q s -l lex=$lib/other.lex $lib/otherg.gr
The fourth step uses the grammar otherg.gr to identify all other
types of phrases. The lexicon it consults is a small list of multi-word
prepositions such as in addition to. The grammar identifies
preposition groups (<pg>), adjective groups (<ag>), adverb groups
(<rg>) and sbar groups (<sg>) so the output for And obviously, over
time, it seems that things get better. is this (<w> mark up
suppressed):
<p><s id="s1">
And <rg>obviously</rg>, <pg>over</pg> <ng>time</ng>, <ng>it</ng>
<vg tense="pres" voice="act" asp="simple" modal="no">seems</vg>
<sg>that</sg> <ng>things</ng>
<vg tense="presorbase" voice="act" asp="simple" modal="no">get</vg>
<ag>better</ag>.
</s></p>
The only words which are not part of a chunk are punctuation marks and
occasional function words such as the And in this example. The heads
of the chunks identified by otherg.gr are not marked as such though
it would be fairly simple to do so if necessary.
Step 5: lxreplace -q phr|@c > $tmp-chunked
The fifth step is the final part of the chunking part of the chunk
pipeline. This step uses lxreplace to discard mark-up which is no
longer needed: <phr> elements were added by the nertag component
and are used by the chunk rules but can be removed at this point. The
c attribute on words is also no longer needed. The output at this
stage is written to a temporary file, $tmp-chunked, which is used as
the input to the next steps in the pipeline which format the chunk
output depending on the choices made with the -s and -p
parameters.
Final steps: style and format
Through the -s parameter, the user can require the chunker output
to conform to a particular style. The possible options for this
parameter are conll, flat, nested or none. As
described in Grover and Tobin (2006) [9], different people may make
different assumptions about how to mark up more complex chunks and
there is a difference between our assumptions and those behind the
mark-up of the CoNLL chunk data. To make it easier to compare with
CoNLL-style chunkers, the grammars in the previous steps of the
pipeline create an initial chunk mark-up which can be mapped to the
CoNLL style or to some other style. The none option for -s
causes this initial mark-up to be output. If the example Edinburgh
University’s chunker output can be made to vary is first processed
with the nertag component so that Edinburgh University is marked
up as an <enamex> and is then processed by the following two steps:
$here/scripts/chunk -s none -f inline |
lxreplace -q w
then the output is as follows:
<s>
  <ng>
    <ng>
      <enamex type="organization">Edinburgh University</enamex>
    </ng>
    <cng>'s chunker output</cng>
  </ng>
  <cvg>
    <vg modal="yes" asp="simple" voice="pass" tense="pres">can be made</vg>
    <vg modal="no" asp="simple" voice="act" tense="inf">to vary</vg>
  </cvg>
</s>
The example contains a possessive noun phrase and a verb with an
infinitival complement, which cause the main points of difference in
style. The <cng> and <cvg> elements have been created as temporary
mark-up which can be modified in different ways to create different
styles. CoNLL style is created through the following lxreplace
steps:
lxreplace -q cvg -t "<vg>&children;</vg>" |
lxreplace -q "vg/vg" |
lxreplace -q "ng[cng]" -t "&children;" |
lxreplace -q "cng" -t "<ng>&children;</ng>" |
lxreplace -q "ng[ng]" -t "&children;" |
lxreplace -q "numex|timex|enamex"
Here the embedded <ng> and the <cng> are output as <ng> elements
while the embedded <vg> elements are discarded and the <cvg> is
mapped to a <vg>. Mark up created by nertag (<numex>, <timex>
and <enamex> elements) is also discarded:
<s>
  <ng>Edinburgh University</ng>
  <ng>'s chunker output</ng>
  <vg>can be made to vary</vg>
</s>
An alternative non-hierarchical style is created using the -s flat
option which causes the following lxreplace steps to be taken:
lxreplace -q cvg |
lxreplace -q "cng|ng/ng" |
lxreplace -q "numex|timex|enamex"
Here the <cvg> is removed and the embedded <vg> elements are
retained while embedded mark up in <ng> elements is removed and
nertag mark-up is also removed:
<s>
  <ng>Edinburgh University's chunker output</ng>
  <vg tense="pres" voice="pass" asp="simple" modal="yes">can be made</vg>
  <vg tense="inf" voice="act" asp="simple" modal="no">to vary</vg>
</s>
The nested style is provided for users who prefer to retain a
hierarchical structure and is achieved through the following
lxreplace steps:
lxreplace -q "cng" |
lxreplace -q "cvg" -n "'vg'"
The output of this style is as follows:
<s>
  <ng>
    <ng>
      <enamex type="organization">Edinburgh University</enamex>
    </ng>
    's chunker output
  </ng>
  <vg>
    <vg modal="yes" asp="simple" voice="pass" tense="pres">can be made</vg>
    <vg modal="no" asp="simple" voice="act" tense="inf">to vary</vg>
  </vg>
</s>
So far all the examples have used the -f inline option, however, two
other options are provided, bio and standoff. The bio option
converts chunk element mark-up to attribute mark-up on <w> elements
using the CoNLL BIO convention where the first word in a chunk is marked
as beginning that chunk (e.g. B-NP for the first word of a noun
group), other words in a chunk are marked as in that chunk
(e.g. I-NP for non-initial words in a noun group) and words outside
a chunk are marked as O. These labels appear as values of the
attribute group on <w> elements and the chunk element mark-up is
removed. This conversion is done using lxt with the stylesheet
TTT2/lib/chunk/tag2attr.xsl. If the previous example is put through
$here/scripts/chunk -s flat -f bio, the output is this (irrelevant
attributes suppressed):
<s>
  <w group="B-NP">Edinburgh</w>
  <w group="I-NP">University</w>
  <w group="I-NP">'s</w>
  <w group="I-NP" headn="yes">chunker</w>
  <w group="I-NP" headn="yes">output</w>
  <w group="B-VP">can</w>
  <w group="I-VP">be</w>
  <w group="I-VP" headv="yes">made</w>
  <w group="B-VP">to</w>
  <w group="I-VP" headv="yes">vary</w>
  <w group="O">.</w>
</s>
Chunk-related attributes on words are retained (e.g. headn and
headv) but attributes on <vg> elements have been lost and would
need to be mapped to attributes on head verbs if it was felt necessary
to keep them. Note that BIO format is incompatible with hierarchical
styles and an attempt to use it with the nested or none styles
will cause an error. If the bio format option is chosen the output
can then be passed on for further formatting, for example to create
non-XML output. The stylesheet TTT2/lib/chunk/biocols.xsl has been
included as an example and will produce the following column format:
Edinburgh NNP B-NP
University NNP I-NP
's POS I-NP
chunker NN I-NP
output NN I-NP
can MD B-VP
be VB I-VP
made VBN I-VP
to TO B-VP
vary VB I-VP
. . O
The standoff format is included to demonstrate how NLP component mark-up
can be encoded as standoff mark-up. If the previous example is put
through $here/scripts/chunk -s flat -f standoff, the output is this:
<text>
<p>
  <s>
    <w p="NNP" pws="yes" id="w1" locname="single">Edinburgh</w>
    <w p="NNP" pws="yes" id="w11" common="true">University</w>
    <w p="POS" pws="no" id="w21">'s</w>
    <w headn="yes" p="NN" pws="yes" id="w24">chunker</w>
    <w headn="yes" p="NN" pws="yes" id="w32">output</w>
    <w p="MD" pws="yes" id="w39">can</w>
    <w p="VB" pws="yes" id="w43">be</w>
    <w headv="yes" p="VBN" pws="yes" id="w46">made</w>
    <w p="TO" pws="yes" id="w51">to</w>
    <w headv="yes" p="VB" pws="yes" id="w54">vary</w>
    <w p="." sb="true" pws="no" id="w58">.</w>
  </s>
</p>
<standoff>
  <ng sw="w1" ew="w32">Edinburgh University's chunker output</ng>
  <vg sw="w39" ew="w46" modal="yes" asp="simple" voice="pass" tense="pres">
    can be made
  </vg>
  <vg sw="w51" ew="w54" modal="no" asp="simple" voice="act" tense="inf">
    to vary
  </vg>
</standoff>
</text>
Using lxt with the stylesheet TTT2/lib/chunk/standoff.xsl, the
chunk mark up is removed from its inline position and a new <standoff>
element is created as the last element inside the <text> element. This
contains <ng>, <vg> etc. elements. The text content of the elements
in <standoff> is a copy of the string that they wrapped when they were
inline. The relationship between the <w> elements in the text and the
chunk elements in <standoff> is maintained through the use of the
sw and ew attributes whose values are the id values of the
start and end words of the chunk. If the nested style option is
chosen then all levels of nertag and chunk mark-up are put in
the <standoff> element:
<standoff>
  <ng sw="w1" ew="w32">Edinburgh University's chunker output</ng>
  <ng sw="w1" ew="w11">Edinburgh University</ng>
  <enamex sw="w1" ew="w11" type="organization">Edinburgh University</enamex>
  <vg sw="w39" ew="w54">can be made to vary</vg>
  <vg sw="w39" ew="w46" tense="pres" voice="pass" asp="simple" modal="yes">
    can be made
  </vg>
  <vg sw="w51" ew="w54" tense="inf" voice="act" asp="simple" modal="no">
    to vary
  </vg>
</standoff>
Visualising output
XML documents with many layers of annotation are often hard to read. I this section we describe ways in which the mark-up from the pipelines can be viewed more easily. Often, simple command line instructions can be useful. For example, the output of run can be piped through a sequence of LT-XML2 programs to allow the mark-up you are interested in to be more visible:
echo 'Mr. Joe L. Bedford (www.jbedford.org) is President of JB Industries Inc. Bedford
opened an office in Paris, France in September 2007.' |
./run |
lxreplace -q w |
lxgrep "s/*"
This command processes the input with the run script and then
removes the word mark-up and pulls out the chunks (immediate daughters
of <s>) so that they each appear on a line:
<ng><enamex type="person">Mr. Joe L. Bedford</enamex></ng>
<ng><url>www.jbedford.org</url></ng>
<vg tense="pres" voice="act" asp="simple" modal="no">is</vg>
<ng>President</ng>
<pg>of</pg>
<ng><enamex type="organization">JB Industries Inc</enamex></ng>
<ng><enamex type="person" subtype="otf">Bedford</enamex></ng>
<vg tense="past" voice="act" asp="simple" modal="no">opened</vg>
<ng>an office</ng>
<pg>in</pg>
<ng><enamex type="location">Paris</enamex></ng>
<ng><enamex type="location">France</enamex></ng>
<pg>in</pg>
<ng><timex type="date">September 2007</timex></ng>
Another approach to visualising output is to convert it to HTML for
viewing in a browser. In TTT2/lib/visualise we provide three style
sheets, one to display nertag mark-up (htmlner.xsl), one to
display chunk mark-up (htmlchunk.xsl) and one to display both
(htmlnerandchunk.xsl). The following command:
echo 'Mr. Joe L. Bedford (www.jbedford.org) is President of JB Industries Inc. Bedford
opened an office in Paris, France in September 2007.' |
./run |
lxt -s ../lib/visualise/htmlnerandchunk.xsl > visualise.html
creates an HTML file, visualise.html which when viewed in a browser
looks like this:
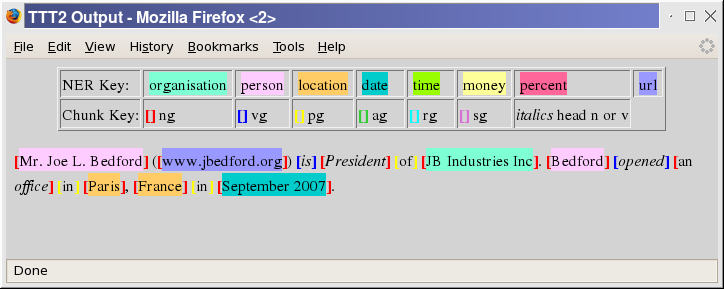
Visualisation of nertag and chunk mark-up
Footnotes
| [1] | http://www.gutenberg.org/etext/3203 |
| [2] | Curran, J. R. and S. Clark (2003). Investigating GIS and smoothing for maximum entropy taggers. In Proceedings of the 11th Meeting of the European Chapter of the Association for Computational Linguistics (EACL-03), pp. 91–98. |
| [3] | Marcus, M. P., B. Santorini, and M. A. Marcinkiewicz (1993). Building a large annotated corpus of English: the Penn Treebank. Computational Linguistics 19(2). |
| [4] | Minnen, G., J. Carroll, and D. Pearce (2000). Robust, applied morphological generation. In Proceedings of INLG. |
| [5] | http://lexsrv3.nlm.nih.gov/SPECIALIST/Projects/lexicon/2007/release/LEX/LRNOM.
The SPECIALIST lexicon is Open Source and is freely available
subject to certain terms and conditions which are reproduced in the
LT-TTT2 distribution as
TTT2/lib/lemmatise/SpecialistLexicon-terms.txt. |
| [6] | Chinchor, N. A. (1998). Proceedings of the Seventh Message Understanding Conference (MUC-7). |
| [7] | Mikheev, A., C. Grover, and M. Moens (1998). Description of the LTG system used for MUC-7. In Seventh Message Understanding Conference MUC-7). |
| [8] | This list is available for download and local use within the limits
of the ADL copyright statement, which is reproduced in the LT-TTT2
distribution as TTT2/lib/nertag/ADL-copyright-statement.txt. |
| [9] | (1, 2) Grover, C. and R. Tobin (2006). Rule-based chunking and reusability. In Proceedings of LREC 2006, Genoa, Italy, pp. 873–878. |
| [10] | Tjong Kim Sang, E. F. and S. Buchholz (2000). Introduction to the CoNLL-2000 shared task: Chunking. In Proceedings of the Conference on Natural Language Learning (CoNLL-2000). |